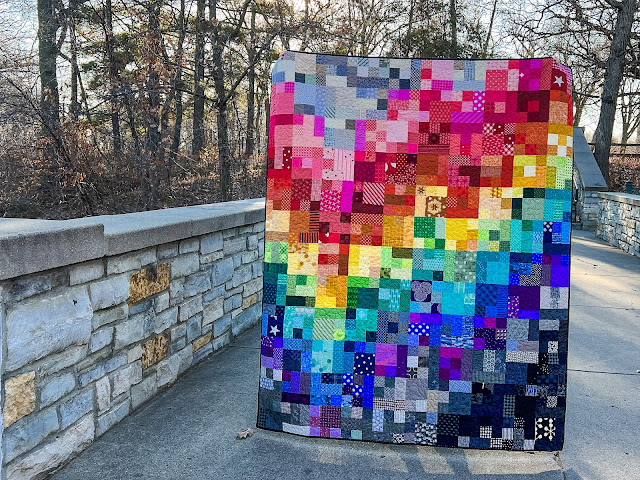
Scrap Cabinet: A Scrappy Rainbow Finish
Today I am sharing the scrappiest of finishes with you: my rainbow Scrap Cabinet quilt!
If you're a fan of my quilts, first of all, Thank you!, and second of all, you know that I love to make scrappy quilts! Normally the fabric pulls for my scrappy quilts come from all over my sewing room: yardage (any cut that's a half yard or more), fat quarters, charm squares, mini charm squares, the Alison Glass scrap drawer, the overflow bins of fabric I don't have another home for, and, of course, the humble scrap cabinet.
This is where all the random bits of fabric live. It's mostly pieces of fabric that are too small to be folded into fat quarters for my fat quarter bins and leftover precuts. I bought the plastic organizer at Michaels a long time ago and it works well for me; I like that I can slide the drawers completely out and bring them over to my cutting table when I'm working with a certain color. The yellow tray on the bottom holds my brown scraps and the orange box on the top has large pieces of low volume fabrics. Earlier this year, I was participating in the One Quilty Goal challenge and became obsessed with the progress pictures of Diary of a Madkapquilter's Scrap Snap Quilt.
I immediately knew I wanted to make a quilt with this patterns and after chatting with her a bit she directed me to the Scrap Snap quilt pattern by Quilts for the Making. I was struck by the chevron pattern and decided I was going to make it, but limit myself only to the scraps in my scrap cabinet. No cutting into fat quarters and yardage, no looking at charm squares that were still in a charm square package, just things that were in the actual scrap cabinet.
And I did pretty well! I cleaned out my scrap cabinet at the same time - some of the pieces in there were too small to be useful in any project so they were binned and some were solids, not prints, so those got moved to my scrap solids pan. And of course, many of them got used in this quilt top! Almost the whole quilt came out of the scrap cabinet - orange was my one exception. I physically didn't have enough orange scraps to make this work so I did have to cut into a few fat quarters to finish the blocks. The black was by far the easiest because I do a lot of black bindings so there were a lot of black pieces that were the right width to be used into this quilt.
It was surprisingly hard to get a good picture of the back, binding, and quilting of this quilt. I tried lots of things and most of the time it ended up looking washed out and gray. The blacks in this picture are still a little gray, but just trust me, the colors look better in real life. There is a lot going on here. First, an ancient Zen Chic charm square that I've been hoarding forever and finally decided to use. This is how you know I'm going to keep this quilt for myself. Second, the snuggly flannel back. My kids were trying to use this one before the binding was even sewn on because it's so soft and such a perfect size. Third, the quilting is an all-over meander, but I switched the thread color for each section of the chevron. You can see several thread colors in the picture; it's not a variegated thread, it's me going across the whole quilt in a meander and then switching colors. I didn't want to have to go through all the diagonal corners of the blocks, so the borders of each color are fluid. The red creeps into the orange in places, and the orange returns the favor with both red and yellow, etc. Finally, the rainbow dot binding. I love both a black and a polka dot binding, so it was fun to combine them here. I struggled a bit to sew the black binding on the black back with black thread at night, but with the help of my son's camping headlamp I got it done.
I've wanted to take a quilt photo at our local waterfall forever, but the lower observation deck was closed the day we went so we had to content ourselves with looking down at it from above. You can see the icicles hanging and the water running in the middle if you can distract yourself from the beautiful quilt at the side of the image. My son was a great sport about helping me get these photos and posing for this one (he works for donuts). Now it's time to go put together a batch of Christmas fudge and relax under my new quilt next to the Christmas tree!


Comments