Good morning! Now that summer is winding down, I'm jumping into another
new quilt-along, this time with the
Fat Quarter Shop.
This one features the Moonlight Quilt from the
Halloween Memories book by Susan Ache.

Oh, it looks my book has been slightly amended! Since I just finished a
Halloween quilt last week (more on that later!), I decided to get a jump on
the next holiday and make my version of the quilt in Christmas fabrics.
Because really, any quilt can be made to fit any theme. I'm going
with bold colors and the
In From the Cold fabric collection.

The red and green coloring sheet is my colors and the orange and purple
version is on the back of the book. Changing the colors will make this
look like a completely different quilt! I'm also very excited about the
very tiny fussy cutting that I'm adding in to some of the blocks (this is
optional - don't let it scare you off!).

Interested in sewing along with me? This is a very relaxed quilt-along
and the goal is to make the quilt in 9 weeks at your own pace. For my
checkerboard layout, I need to make 7 sets of 4 identical blocks. For
Week 1, I spent some time getting familiar with the pattern and deciding how I
was going to sew it (for example, I always use my
Almost No-Waste Flying Geese method
for flying geese. I like this method because it gives me one goose in
each direction when I'm using directional fabric like I am with the background
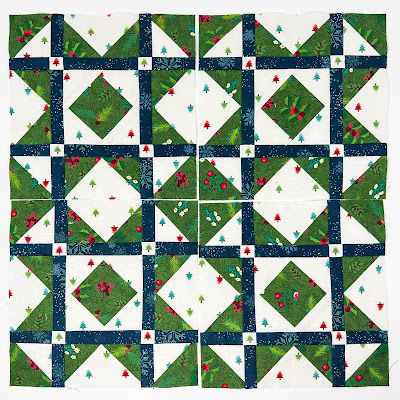
fabric in these blocks). Then I did my first set of green blocks to see
how it all comes together.

Looks like these guys approve so I'm good to move on with the rest of the
quilt. Here's my plan for finishing on-time - you can
follow me on Instagram
to see my week-by-week progress. I condensed my schedule down into eight
weeks so I can skip a week when life gets in the way of my sewing.
Week 2: 2 green sets
Week 3: Hourglass blocks
Week 4: Assemble green block rows
Week 5: 2 red sets
Week 6: 2 red sets
Week 7: Assemble red block rows
Week 8: Add borders
Week 9: Catch-up for any weeks missed

A Note for Week 3: The assembly diagrams for the quilt show that
all of the hourglass blocks are set in the same way, but if you look at the
pictures of the finished quilt, this is a mistake. The design has the
star blocks set in diamonds so half of the hourglass blocks need to be
rotated.
If you are using directional fabric like me, this means you will need to draw
half of your diagonals upper left to lower right and half of the diagonals lower
left to upper right. My pencil line didn't show up in the photograph so I
added a dotted line to show this. I then folded back my fabric along the
dotted line before sewing to make sure that all the fabrics would be pointed the
same direction before sewing them together. If you aren't using
directional fabric, you can just sew and rotate without all the extra worry!
A Tip for Week 8: Make the border blocks, but sew the pieces to
the ends of the rows before you assemble them. It's easier to line
things up that way! Make the top and bottom borders as described in
the pattern.
And, the big reveal - my finished quilt! On-time for week nine!
The most tedious part of this quilt was fussy cutting the tiny trees in some
of my background fabric. There is a single tiny tree in the white
cornerstones of each green block and the trees are centered in the navy
sashing of the red blocks. This took a lot of
work, but the end result is completely worth it! There's also a
pattern within the blocks of where each tiny tree color is located - I put a
lot of thought and effort into this!

The quilting is a snowflake pattern in a light green and was done by
Jill Scholtz. The back is a soft novelty-print flannel, and the binding is the
leftover red from the main squares. I had originally intended to bind
it in the same fabric as my outer border, but changed my mind. That's
a more modern way of doing things and this quilt leans traditional. Plus the red looks better with the back. I wasn't
sure how the bigger motifs in the red background fabric would look in the
skinny binding, but it's totally fine and inspiring me to be less
conservative with my future binding choices (I almost always use a solid or
blender).


Comments