One, Two, Tree!
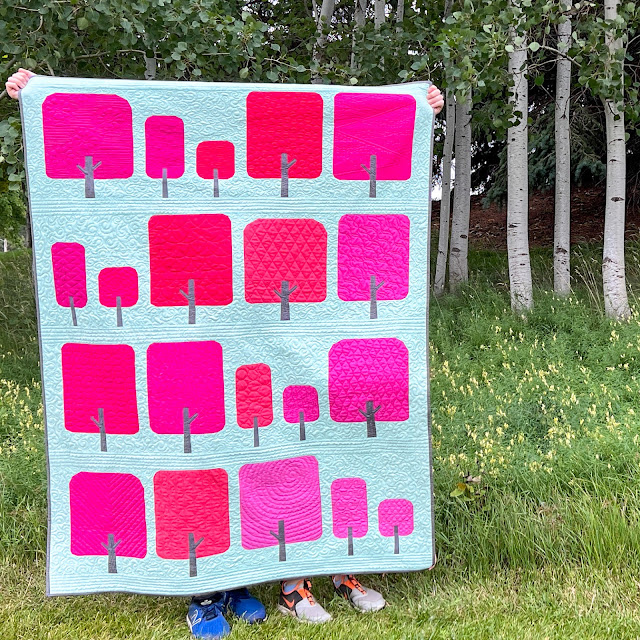
My beautiful pink ombre forest is finished!

This quilt is the result of a wonderful quilt-along hosted by Sugaridoo that combines two of my favorite quilting things: paper-piecing and free-motion quilting. As soon as I saw the concept, I knew I was in. I also immediately knew that I wanted to do a pink ombre forest, but decided to use the background and tree trunk colors recommended by Irene (Kona Ice Frappe and Kona Graphite).

I ordered a variety of Kona pinks and ordered them from darkest to lightest. I purposely ordered an extra pink to make sure I would like the final ombre. The colors I had were Bright Pink, Cotton Candy, Dragon Fruit, Honeysuckle, Punch, Sassy Pink, Watermelon, and Valentine. They weren't labeled when I received them so I have them listed alphabetically here.

I arranged them from darkest to lightest, labeled them A-G, and then assigned the colors to the trees on my coloring sheet. From here it was super-easy to grab the correct colors when we were given the patterns. Each finished tree was labeled with its number so when all twenty trees were done it was quick and easy to lay them out in order and sew them together. I do all my labeling with painter's tape because it comes off cleanly when I am finished.


This quilt is the result of a wonderful quilt-along hosted by Sugaridoo that combines two of my favorite quilting things: paper-piecing and free-motion quilting. As soon as I saw the concept, I knew I was in. I also immediately knew that I wanted to do a pink ombre forest, but decided to use the background and tree trunk colors recommended by Irene (Kona Ice Frappe and Kona Graphite).

I ordered a variety of Kona pinks and ordered them from darkest to lightest. I purposely ordered an extra pink to make sure I would like the final ombre. The colors I had were Bright Pink, Cotton Candy, Dragon Fruit, Honeysuckle, Punch, Sassy Pink, Watermelon, and Valentine. They weren't labeled when I received them so I have them listed alphabetically here.

I arranged them from darkest to lightest, labeled them A-G, and then assigned the colors to the trees on my coloring sheet. From here it was super-easy to grab the correct colors when we were given the patterns. Each finished tree was labeled with its number so when all twenty trees were done it was quick and easy to lay them out in order and sew them together. I do all my labeling with painter's tape because it comes off cleanly when I am finished.
I slightly altered the paper-piecing patterns to sew the two tiny trees
individually because I didn't want to match seams in the tree trunks.
Using a single piece of fabric to sew each of them was much less
stressful! My mother-in-law also used my altered pattern to sew her
trees!
And then it was time to start quilting! I had my brand-new free-motion
ruler foot and both new and old quilting rulers. I appreciated all the
different patterns and techniques that were given to us, and since each tree
was 8x11 at most even the patterns I didn't enjoy (two of the patterns
resulted in frequent thread breakage and one was just overly boring) quilted
up quickly. I debated about the thread color, but ended up using the
same pink for all of the trees. I find that thread doesn't have to be an
exact match - as long as it's a similar shade it will blend. Plus, since all the trees are quilted differently so I wanted
the quilting to stand out!


As a contrast to all the tree tops being quilted differently, all of the tree
trunks are quilted the same way. The quilt-along called for loose, wavy lines
in the background but as a chronic over-quilter I wanted something a little
more. I was clicking on the quilt-along hashtag after I posted each tree and Amy Stephens had already posted her finished quilt. She used horizontal lines between the rows of trees and I thought
this was a fantastic idea; it really grounds each of them like they are in a
forest. Between the trees I did a free-motion design that is supposed to
give the illusion of wind - it was hard to find a pattern I hadn't already
used in a tree!
The back of my quilt is actually a second quilt-along quilt! I knew I
wanted to use up all of my pink scraps on the back, and when I saw the Bauhaus quilt pattern by Zen Chic it instantly called to me. My version only has
three rows because that's where I ran out scraps! I cut out my binding
from the leftover trunk fabric, then used the rest of the leftover gray fabric
to frame in the Bauhaus portion of the back. The pink above and below
this section is the final pink that I bought for the front and didn't use.
This used up all my fabric almost perfectly!
And the ombre is a lot more obvious on the back! It's such
a fun, graphic pattern; I would love to make this again as the main quilt. The different patterns from the trees on front
give it a fun texture too.
This quilt finished at a comfortable 51x68, and is currently a favorite couch
quilt in our family room - every time I walk in someone is using it! The
best part is, it reminded me how much I love to do different FMQ patterns and
I'm looking forward to doing some more custom quilting on my other tops that
are almost finished!
===================================
I'm linking this post up for July 2022 Favorite Finishes with Cheryl at Meadow Mist Designs!


Comments